Monday 29 April 2013

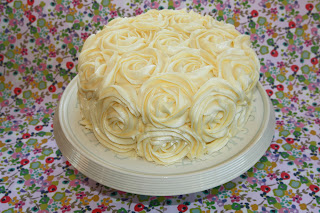
Lemon layer cake with lemon buttercream roses

Lemon layer cake with lemon buttercream rose swirls

Birthday cake time! Not for me but for a very good friend. As I know she loves lemon cake, I decided to stick with a safe and well-trusted recipe that I have done before – Primrose Bakery’s Lemon Layer Cake. I won’t type out the recipe again, as it is the one I wrote a blog on in November for my Halloween Lemon Layer Cake.  We were going out for dinner on Friday so the cake had to be made on Thursday after work. Thankfully, it’s a fairly simple cake to make and bake – as long as you get the timings right.

This time, rather than buttering the sandwich tins and lining the bases, I used my trusty Dr Oetker Cake Release spray – it is so easy to use and does the job really well.  I think I mentioned it last time, but do make sure you keep an eye on these cakes – you do not want them to over-bake. This time, the cakes still looked slightly anaemic, but were bouncy when touched – this is what you are looking for.

As I was baking this after work, it was quite late by the time the cakes had baked and cooled, therefore, I decided to just do a crumb layer of buttercream icing on the Thursday night. A crumb layer is basically just a simple thin covering of icing all over the cake. This seals the cake and creates a good base for then icing the roses.  Leaving it overnight meant that this layer of buttercream had firmed really well and made it much easier to pipe the roses.

The buttercream is best left in the fridge overnight but needs to be taken out of the fridge for at least an hour before using, and then given a really good beat!  People are always amazed by rose swirls on cakes and cupcakes but they are really not that difficult to do. This is a good photo tutorial and there are lots of film clips on YouTube. To be honest, the main things are getting the consistency of the buttercream right, a Wilton 2D piping nozzle, steady pressure on the icing bag and lots of practice! I do them quite a bit and I still have days when they just don’t seem to go right!   

I’ve attempted this design of icing before and found the sides to be very tricky. This time, I used my tilting turntable (placed on top of a cake tin to bring it up to a good height) and this made piping the swirls onto the cake much easier!  

For full cake recipe, visit this blog post.

Filling and decorating the cake

Ingredients
  1. 6 tblsp lemon curd
  2. 220g butter, at room temperature
  3. 1kg icing sugar
  4. Juice of 2-3 lemons
To make the buttercream icing:
  1. In a large mixing bowl, beat the butter, juice of 2 lemons and half of the icing sugar until smooth.
  2. Add the rest of the icing sugar and beat until smooth and creamy.
  3. Add extra juice, if required to get the correct consistency. Beat until smooth.

To assemble
  1. Place the first cake onto your plate / stand.
  2. Spread 3 tablespoons of lemon curd on top of the first cake and another 3 on a second cake.
  3. Carefully place the second cake on top of the first cake.
  4. Place the third cake on top of the others.
  5. Use a palette knife to spread a thin layer of buttercream icing evenly all over the cake. Leave to firm.
  6. Fill a piping bag (topped with a suitable nozzle) with the remaining buttercream.  
  7. Start by piping a rose swirl in the centre of the cake, then work outwards and down the sides of the cake.
  8. Fill any gaps with swirls of icing.


Raspberry and Apple Crumble Squares

Raspberry and apple crumble squares


Another new bake for the weekend!  After a lovely sunny Saturday afternoon wandering around Tyntesfield gardens (accompanied, of course by a trip to the café and a lovely cream tea!), I realised that I was meeting friends for lunch the next day and should rustle up a cake to take along.  Again, I didn’t feel like making anything too time-consuming so I had a rustle through my recipes and found this recipe for Raspberry and Apple Crumble Squares from BBC Good Food Magazine.


I decided to add a bit of cinnamon to the crumble topping for flavour, and added some chopped hazelnuts for extra crunch. I’ve reduced the amount of raspberries slightly – partly because most punnets of raspberries are 150g and also because this amount spread across the top of the cake perfectly.


To ensure an even bake, I wrapped my magi-cake strips around the baking tin before placing it in the oven. As a warning, the crumble layer on top means that it is difficult to tell when this cake is cooked. I baked the cake for just over an hour (my oven always takes longer to bake than recipes say) – the crumble was lovely and golden, but it turned out that the cake wasn’t quite cooked.  Next time, I’ll bake for even longer, covering the top with a layer of foil to prevent the crumble burning.


Even though the cake was slightly undercooked, overall the cake tasted great: the hazelnuts in the crumble added a lovely crunchy texture and an extra flavour dimension and the fruit in the cake was delicious. It’s great on its own with a cup of tea, but would also be fantastic with a nice dollop of custard for dessert. I'm sure that this cake would taste fantastic with other fruits as well: blackberry and apple, peach and raspberry, strawberry and rhubarb, etc.  


Raspberry and Apple Crumble Squares


Ingredients

  1. 1 large, or two small Bramley apples, peeled and diced
  2. 100g butter, softened
  3. 175g golden caster sugar
  4. 1 egg, whisked
  5. 280g self-raising flour
  6. 125ml milk
  7. 150g raspberries


For the crumble topping

  1. 50g butter , diced
  2. 85g self-raising flour
  3. 100g golden caster sugar
  4. 60g chopped hazelnuts
  5. 1 tsp cinnamon
  6. Zest of 1 lemon

Method

  1. Heat oven to 180C/160C fan/gas 4 and line a 20 x 30cm cake tin with baking parchment.
  2. Put the apple in a small pan with 2 tblsp water.
  3. Cook over a low heat, stirring regularly, until the apple starts to soften.
  4. Meanwhile, make the crumble topping: rub the butter into the flour, sugar, cinnamon and lemon zest until it resembles breadcrumbs.
  5. Stir in the hazelnuts and then set the crumble mixture to one side.
  6. Use a hand/stand mixer to beat the butter and sugar in a large bowl until fluffy – this will take about 5 minutes.
  7. Gradually add the egg, beating to incorporate.
  8. Gently stir in half of the flour and then half of the milk.
  9. Stir in the remaining flour and then the remaining milk.
  10. Stir in the apples.
  11. Spoon the mixture into the tin, smooth the surface, then dot with the raspberries.
  12. Sprinkle over the crumble topping.
  13. Bake for 45-60 minutes or until a skewer inserted comes out clean and the crumble is golden. You may need to cover the top with foil after about 45 minutes, so that it does not burn while the rest of the cake is still baking. 
  14. Once baked, remove from the oven and leave in the tin to cool. 
  15. Once cool, remove from tin and cut into 16 pieces.

Tuesday 16 April 2013

Condensed milk cookies

Stem ginger cookies with lemon icing

Having spent all morning lazing in bed and reading, I decided that I should do something a bit more productive with my Sunday afternoon. Unusually, I didn’t feel like faffing around with fancy decorative icing, so I decided to make some simple biscuits for EHH to take into his work. I had a flick through my recipe files and cook books, but wasn’t feeling particularly inspired so I decided to go with one of my tried-and-tested recipes.


I call these “condensed milk cookies” – they came from Sainsbury’s magazine ages ago, which called them “soft, American-style cookies”. They are amazing – a bit like “Millie’s Cookies” – with a crisp outside and soft, chewy centre. The magazine gave 6 variations – I made three types this weekend: lemon and ginger, oats and honey, and cherry and almond, with slight variations on the magazine’s recipes. I always feel the need to make more than one batch of these – once you’ve opened the tin of condensed milk, it seems a waste not to! However, I have got about half a tin left, so I may need to make some more later in the week!


Cherry and almond cookies


Makes 12
Ingredients

    Cherry and almond cookies
  1. 125g soft unsalted butter
  2. 125g caster sugar
  3. 2 tblsp condensed milk
  4. 175g self-raising flour
    Pinch of salt
  5. 75g glace cherries, chopped finely
  6. 2 tblsp flaked almonds
  7. 1 tsp almond essence
  8. 75g icing sugar

Method

  1. Preheat oven to 150C.
  2. Using an electric/stand mixer, cream the butter and sugar until pale and fluffy.
  3. Beat in the condensed milk and the almond essence.
  4. Add the flour and a pinch of salt and mix.
  5. Stir in the cherries.
  6. Roll into 12 walnut sized balls and space at least 5cm apart on 2 baking trays.
  7. Flatten them slightly with the back of a spoon.
  8. Scatter each cookie with flaked almonds.
  9. Bake for about 25 minutes or until firm at the edges but still soft in the middle.
  10. Leave to cool for a few minutes before transferring to a cooling rack.
  11. Once cool, drizzle with icing made up from the icing sugar and 1 tblsp water (optional).


Alternatives:
Ginger and Lemon

  • For Step 3: Omit almond essence.
  • For Step 5: Omit cherries. Instead, add 2 tsp ground ginger, zest of one lemon and 75g of finely chopped crystallised or stem ginger.
  • Omit Step 8.
  • For Step 11, drizzle with icing made from 75g icing sugar with 1 tblsp lemon juice. 


Oats and honey

    3 oat and honey chewy cookies
  • For Step 3: Use 1 tblsp of honey and 1 tblsp condensed milk. Omit almond essence.
  • For Step 5: Omit cherries. Instead, add 75g oats.
  • For Step 8: Drizzle each cookie with honey and scatter with oats.
  • Omit Step 11.

Friday 12 April 2013

Raspberry and blueberry lime drizzle cake


A slice of blueberry and raspberry lime drizzle cake


During Easter week, EHH’s parents came over to help us tackle the garden. I needed something fairly simple that I could whip up in the morning before they arrived, as I was playing netball the night before. I had a flick through my recipe file and found this recipe for raspberry and blueberry lime drizzle cake from BBC Good Food. I first made this last summer and it was delicious, but slightly too sticky. Therefore, this time, I decided to reduce the amount of syrup. Having read the comments on the website, I also decided to coat the fruit in flour to prevent them from sinking. One more simple touch that I added was a sprinkling of golden castor sugar on top at the end – this adds a lovely sweet crunch, which contrasts well with the soft sticky cake.


It is a really simple cake to make. I used my Magi-cake strips to prevent the outside of the cake from over-cooking; they also help to ensure that the cake rises evenly: I would highly recommend them!  The only tricky part is the length of time to cook - this varies enormously depending on your oven. Keep an eye on the cake after about 25-30 minutes as the top may begin to get too brown - cover with foil if it does look like it needs it. Test with a skewer to check whether it is cooked. 


The end result is delicious and lasts well for about 3-4 days. It is great on its own with a cup of tea and also works well as dessert – with cream or custard. Definitely one of my favourite cakes!


Raspberry and blueberry lime drizzle cake


Blueberry and raspberry lime drizzle cake cooling on the rack
Ingredients

  1. 225g softened butter, plus extra for greasing
  2. 225g golden caster sugar
  3. 4 medium eggs
  4. 2 limes, grated zest and juice
  5. 250g self-raising flour, sifted with a pinch of salt, plus extra flour
  6. 25g ground almonds
  7. 100g each blueberries and raspberries
For the syrup:
  1. Juice of 2 limes
  2. Grated zest of 1 lime
  3. 80g golden caster sugar, plus a little extra for scattering

Method

  1. Set oven to 180C.
  2. Line the base and sides of a 20cm/8in square cake tin (not loose-based) with baking parchment.
  3. Cream the butter and sugar together until light and fluffy (about 5 minutes in an electric mixer).
  4. Gradually beat in the eggs, adding a little flour towards the end to prevent curdling. Beat in the lime zest, then fold in the flour and almonds.
  5. Fold in enough lime juice - about 3 tablespoons - to give you a good dropping consistency (the mixture should drop easily from the spoon when tapped).
  6. Place the blueberries and raspberries in a bowl and scatter with the extra flour. Gently shake the bowl to ensure that all the fruit are evenly coated in flour. 
  7. Blueberry and raspberry lime drizzle cake ready to go in the oven
    Ready to go in the oven!
  8. Fold in three quarters of the blueberries and raspberries and turn into the prepared tin.
  9. Smooth the surface, then scatter the remaining fruit on top - it will sink as the cake rises.
  10. Bake for between 35 and 60 minutes (cover with foil if beginning to brown too much), or until firm to a gentle prod in the centre. A skewer pushed into the centre should be clean when removed.
  11. While the cake is baking, make the syrup: put the lime juice, zest and sugar in a small saucepan. Put over a gentle heat and stir, without allowing to bubble. The sugar should dissolve a little.
  12. As soon as the cake comes out of the oven, prick all over with a skewer then spoon the syrup over it.
  13. Once cool, carefully remove the cake from the tin and discard the lining paper.
  14. Scatter with golden castor sugar and cut into 12 pieces to serve.  
 

Sunday 7 April 2013

Passion fruit cupcakes


Vanilla cupcakes with passion fruit curd and passion fruit buttercream
Having made Millionaire’s Shortbread for my cousin’s visit, I was in a baking mood, so I decided to make some cupcakes too. I had half a jar of passion fruit curd left from making lemon and passion fruit cupcakes not long ago, which needed using up, so I convinced EHH to pop up to the shop to buy me some passion fruits and decided to make passion fruit cupcakes.


I started by straining the passion fruit pulp through a sieve and realised that you don’t get much from three passion fruit! Therefore, I decided to stick with a simple vanilla cupcake base, fill it with passion fruit curd and top with buttercream flavoured with the passion fruit juice.


The vanilla cupcakes worked well as a base for the passion fruit curd and buttercream. However, I think these cupcakes ended up with too much curd and not enough buttercream – the curd over-powered and made the cake slightly too tart (even for my tastes). I think the cakes would have worked better with a filling of curd and a whole swirl of buttercream. The strained passion fruit juice had a real hit of flavour and worked well in the buttercream, although I would suggest 4 passion fruits for slightly more flavour.


Vanilla cupcakes with passion fruit curd and buttercream


Ingredients

  1. 110g butter, at room temperature
  2. 225g golden castor sugar
  3. 2 large eggs
  4. 150g self-raising flour, sifted
  5. 125g plain flour, sifted
  6. 120ml semi-skimmed milk
  7. I tsp vanilla extract
  8. 4 tblsp passion fruit curd

Buttercream:


  1. 115g butter, at room temperature
  2. 500g icing sugar, sifted
  3. 4 passion fruits – juice strained through a sieve
  4. Milk (as needed)

Method

  1. Preheat oven to 160C/350F/GM4.
  2. Line a 12 hole muffin tin with cupcake cases.
  3. In a large mixing bowl, cream the butter and sugar until light and fluffy this will take at least 5 minutes with an electric hand mixer – don’t rush this stage).
  4. Add the eggs, one at a time, mixing for a few minutes after each addition. It should result in a lovely light mousse-like mixture.
  5. Combine the two flours in a separate bowl.
  6. Combine the milk and vanilla extract in a jug.
  7. Add one third of the flours to the creamed mixture and stir gently to combine.
  8. Pour in one third of the milk mixture and stir gently.
  9. Continue to add flours and then milk mixture alternately, stirring gently after each addition, until all have been added.
  10. Spoon mixture into the cupcake cases, filling to about 2/3 full.
  11. Bake in the oven for about 30 minutes until lightly golden brown. The cakes will spring back lightly when touched, if cooked.
  12. Remove from the oven and leave to cool in tin for about 10 minutes, before carefully placing on a wire rack to finish cooling.


While the cakes are in the oven, make up the buttercream:

  1. In a large mixing bowl, beat the butter, passion fruit juice and half of the icing sugar until smooth.
  2. Add the rest of the icing sugar and beat until smooth and creamy.
  3. Add milk (if needed to bring the buttercream to a piping consistency) and beat again.
  4. Put buttercream into a piping bag with a medium star nozzle.

To decorate:

  1. Use a wide skewer to make three deep holes into each cooled cupcake.
  2. Put the passion fruit curd into a piping bag and pipe into each of the holes.
  3. Pipe small swirls of buttercream around the edge of the cupcake.
  4. Fill the centre of the buttercream swirls with curd.


Saturday 6 April 2013

Tutti Pole Tea Shoppe – Hungerford


Today, we ventured along the M4 as far as Hungerford in search of cups and saucers! Sounds strange, but I’ve decided that I would like some vintage/antique tea cups and saucers to use when photographing my cakes. Hungerford is full of antique centres and shops so it seemed like a great place to start the search.

After a bit of a late start (didn’t wake until 12.30!), we didn’t get to Hungerford until about 15.00, so we decided to head straight to get a bite to eat. I’d spotted the Tutti Pole Tea Shoppe sign as we drove through the town and I’m a bit of a sucker for old-fashioned “tea shoppes”! Unfortunately, once inside, the décor was more shabby than chic: the first page of the menu tells that the current owners took over in 1981 – it doesn’t look like they have changed at all since then.  The walls are a rather garish pink and the tables and chairs are dated pine. The cake display on the front counter was also quite unappealing – rather than having whole/partial cakes on display, there was a small, lonely looking slice of each type of cake out as display.

However, walking to our table, I was tempted by the display of huge meringues in an old-school chilled display cabinet and I remained hopeful that the food could be good. The service was a little over-keen, I had barely taken my coat off when we were asked if we were ready to order. We asked for a couple of minutes but were then asked again when we were only half-way through the menu. We had skipped lunch and so we decided to share a sandwich and then have a cake each.  The menu itself did not particularly inspire (both the dated and rather grubby leatherette folder and inserts and the choice of food), again it very much seemed that it hadn’t been updated since the 80s. At this point, I was tempted to get up and leave, but we hadn’t seen anywhere else and it always feels a bit wrong to leave, having sat down at a table and looked at the menu. We decided to stick it out and hope that the food was good.

The sandwich choice was very traditional – cheese, ham, egg, tuna etc and not much tempted. In the end, we decided to share a tuna melt toasted sandwich, EHH went for one of his favourites – bread pudding and I chose one of the huge meringues on display, accompanied, of course, by a pot of tea for two.

EHH's bread pudding
The food and drinks arrived promptly. The pot of tea (expensive at £1.95 per person) came in a 80s style tea set. It easily provided 2 cups of tea each and the extra pot of water would have done an extra cup each, except there weren’t enough tea bags in the pot and so the remaining tea was very weak. We were amused that our toasted sandwich had clearly been done in a 90s toasty-maker, not that we have any objection to this, but it just isn’t something you see very often these days, and very much fitted with our overall impression of the place. The tuna melt toasty itself (pricey for what it was at £4.75) was fine and came accompanied with a little side salad of lettuce, tomato, cucumber and cress – we liked the fact that we had told the waiter that we were sharing and so they had given us half each on our own plate.  

My meringue
EHH’s bread pudding (cheap at about £1.75) was ok but nothing special – it had a good stodgy texture but could have done with more fruit and a bit of spice. My meringue (cheap at £2.75) looked amazing but was really quite disappointing - it was over-sweet and very crisp all the way through, missing the lovely chewy centre that I always look for in a good home-made meringue. It came with a huge amount of cream but only half of a strawberry – would have been nice to have more fruit to balance the extreme sweetness of the meringue. There was no way I could have eaten the whole meringue and so EHH ended up eating half to help me out!

Overall, I was disappointed with Tutti Pole Tea Shoppe – it has so much potential but missed on nearly all aspects.  The pricing of the food and drinks seemed odd – some things quite cheap (particularly the cake) and some really quite expensive. It has a really interesting history, is in a great location and appears to be very much part of the local community (we were touched by a number of pictures on the wall that were given to the place in memory of others) but we spent much of our time in there discussing how it could be updated and improved. We enjoyed our next couple of hours in Hungerford, pottering around the antique centres and will definitely return to the town, but not to the Tutti Pole.